
I've had people ask me how to install photoshop brushes a lot in the past, so I thought I'd make a quick guide. By following these few simple steps, you will be able to install, and use photoshop brushes like a pro!
THE DIFFERENT FILE TYPES
First of all, I'd like to explain the ways that people distribute photoshop brushes. Most of the time you will be downloading an .abr file, which is the actual brush or brushes combined into one single file. These files are backwards compatible, so be sure to know which version of photoshop you use before downloading. For example, if you run version 7 of photoshop, you will not be able to use .abr files that were created in CS or above. Only brushes created in version 7 or lower would work for you.
The second way that brush files are distributed is with .png files. Each of these picture files is typically a grayscale image which allows you to create a brush from it. There is only one per file, so you will have to load the files one by one to create each individual brush file. However, by having .png files, you can bypass the compatibility problems between photoshop versions by loading the picture files and creating brushes yourself.
INSTALLING ABR FILES
All you have to do after downloading your brushes is copy the file to the correct directory.
Copy the *.abr files into:
Program Files\Adobe\Adobe Photoshop X\Presets\Brushes (X being the version of Photoshop you are using).
After doing this, the next time you start photoshop, the brushes you added will be available to use in your brush set menu.
To install a brush set without restarting photoshop, select the brush tool and click the brush selection menu. Click on the arrow that is circled at the right side to open a drop down menu, from there you can select the 'Load Brushes' option.
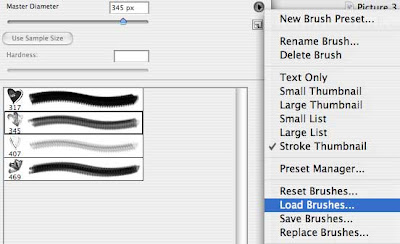
After doing so, you will see a dialog that allows you to select an *.abr file to load. Once you choose the file you want to open, the brush set will load at the bottom of the brush set list in Photoshop. Just remember that if you load brushes this way, they are only temporarily there. Once you change to another brush set, the ones you loaded will no longer be in the brush list.
INSTALLING PNG FILES
Installing brushes from .png files means you will have to do each picture individually. Simply open the .png file you want to create a brush from and select the 'define brush' option from the 'edit' menu. After doing so, make sure to enter a name for the brush and select ok. This will add it to the bottom of your current brush set temporarily.
To save the brushes that show up in the brush set list, choose the circled arrow on the right side to open a drop down menu (use the image from above as reference). From this menu, choose the save brushes option, type a name in the save as box, choose a location to save them to, and select save. Now your new brushes will be saved as a .abr file!
No comments:
Post a Comment